If you live in a pre-1970s building, especially in a city with older housing stock, there's a real chance every outlet in your bedroom is lying to you. They look like proper three-prong outlets. The grounding sheet plugs in fine. But the ground hole connects to nothing, and your sheet might as well be regular bedding.
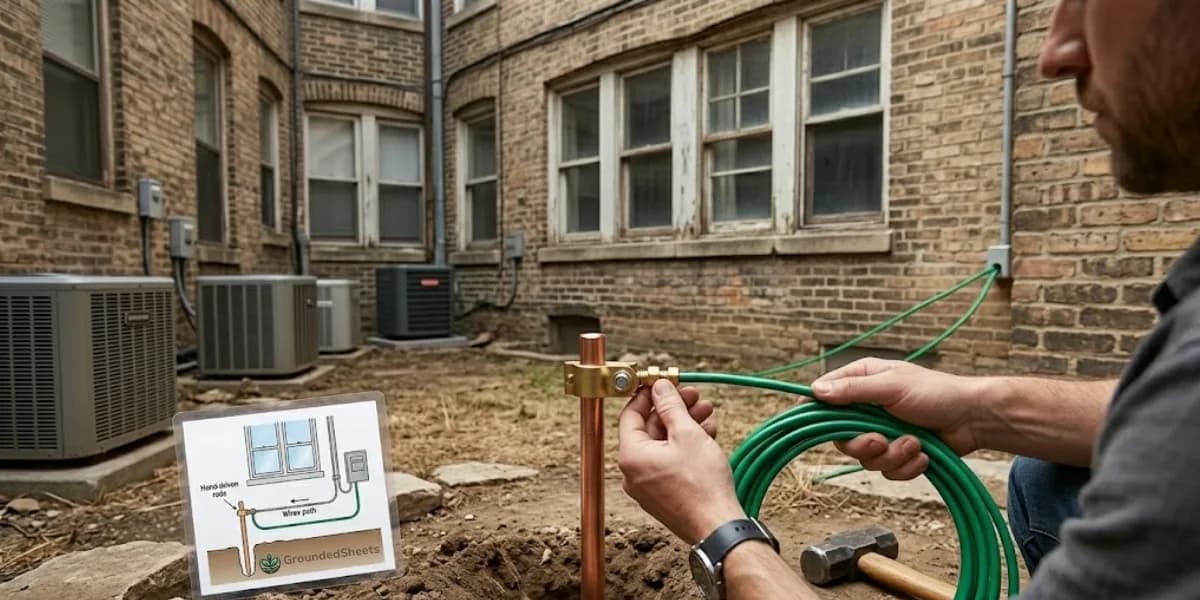
Installing your own ground rod outside the bedroom window solves this completely. It bypasses your home's wiring, gives you a direct connection to actual earth, and costs about thirty-five dollars total. The whole process takes 30 to 45 minutes. You don't need an electrician, you don't need to modify your apartment's wiring, and in the vast majority of rentals you don't need landlord permission.
I've installed maybe a dozen of these for friends over the years. It's the single most reliable solution for anyone in older housing or a rental.
When you actually need a ground rod
Two situations make this the right move.
First, you've tested your outlets with a plug-in tester from how to test if your outlet is grounded and they all show "open ground." This is common in pre-1962 buildings and in apartments where someone swapped two-prong outlets for three-prong outlets without rewiring. If you can't find a single grounded outlet within reach of your bed, an external rod is the practical answer.
Second, you can find one grounded outlet but you've measured a high voltage between neutral and ground (say, 5V or more on a multimeter). This indicates dirty electricity on your home's neutral, which a poorly maintained ground wire might worsen. An external rod gives you a cleaner reference.
If your outlets test fine, skip this. Don't install a rod just because it sounds more direct. Your home's existing ground works perfectly well when it's wired correctly.
What you need
The total kit costs around thirty to forty dollars, depending on what you already have.
A four-foot ground rod. Most grounding-sheet brands sell them as part of a kit. You can also buy them at any home center for about ten bucks. Look for copper-coated steel, four feet long, half-inch diameter. Don't get aluminum. Don't get the eight-foot version sold for whole-house grounding because you can't drive that depth without specialized tools.
A ground rod clamp. Usually included in brand kits, otherwise about three dollars at a home center. This clamps onto the rod and gives you a screw terminal to attach a wire.
Insulated copper grounding wire, 12 to 14 gauge, in whatever length you need to reach from outside the window to your bed. Thirty feet is usually plenty. Five to seven dollars at most hardware stores.
A grounding cord that's compatible with your sheet. Most brands make a "ground rod cord" that has the snap end on one side and a bare wire on the other. About fifteen dollars from the brand. Or you can splice your existing outlet cord by cutting off the plug and attaching the wire directly, but I'd recommend buying the proper cord rather than DIYing this.
Tools: a hammer or sledge, a rubber mallet for the final taps, a pair of pliers, a screwdriver, and a multimeter for verification.
Where to put the rod
Three things matter for rod placement.
Soil moisture. Wet soil conducts electricity. Dry soil doesn't. Put the rod somewhere that stays reasonably moist year-round. Near a downspout, in a garden bed, or on the shaded side of the building works well. Avoid the middle of a sun-baked driveway-adjacent strip that turns to dust in summer.
Distance from the window. You're going to run a wire from the rod to inside your bedroom. Shorter is better but not critical. I'd aim for the rod within 15 feet of the window.
Distance from utility lines. Call 811 (US) or your local equivalent before driving anything into the ground. This is free, takes a few days, and tells you exactly where buried gas, water, electric, and phone lines are. Driving a metal rod into a gas line is a very bad day. Don't skip this step.
For renters in apartment buildings, the practical answer is usually a planting bed or grassy strip near a ground-floor window. If you're on the second floor or higher, you can run a wire down the outside of the building to a rod at ground level. This works but adds complexity.
Driving the rod
Once you've called 811 and gotten the all-clear, the actual install is straightforward.
Start the rod vertically with the pointed end down. Use the hammer or sledge to drive it into the ground. The first foot is the hardest because the rod wobbles. Once it's a foot deep it stabilizes and the going gets easier.
Drive the rod until only about six inches sticks out above the ground. For a four-foot rod, that's about three and a half feet of penetration. This is enough depth to reach below the seasonal dry layer in most US climates and stay in moist soil.
If you hit rock or hard pan and can't drive the rod fully, try a different spot. Bending the rod by hammering harder doesn't help and risks breaking the copper coating, which lets the steel core corrode quickly.
In genuinely rocky soil where vertical driving is impossible, you can run the rod horizontally in a trench about 18 inches deep. This works but is more annoying. Most yards aren't this bad.
Connecting everything
Slide the ground rod clamp onto the exposed top of the rod. Tighten the screw firmly. Strip about half an inch of insulation off one end of your copper grounding wire. Insert the bare wire into the clamp's terminal and tighten the second screw.
Run the wire from the clamp to your bedroom window. Outside the window, secure the wire with a few exterior-grade cable clips or zip ties so it doesn't flap in the wind.
Inside the window, you have two options for getting the wire through. The cleaner option is to run it through an existing window screen by carefully pushing the wire between the screen mesh fibers. The screen will accept a thin wire without visible damage. The other option is to crack the window open about a quarter inch and run the wire under the sash. Window-open setups work fine in mild weather but are obviously a non-starter in winter.
Once the wire is inside, connect it to your grounding sheet's cord. If you bought a brand-specific ground rod cord, the snap end attaches to your sheet directly. If you're DIYing with a cut-off plug end, twist the bare wire to the cord wire and secure with a wire nut. Then plug or snap the cord into your grounding sheet.
Verifying the rod actually works
Don't trust the install until you've measured it.
Run the body voltage test from how to test if your grounding sheet is working. With everything connected, your body voltage should drop from the typical 1-3V down to under 0.1V when you sit on the sheet, just as it would with a properly grounded outlet.
If the drop happens, congratulations, you have a working ground rod system that's bypassing whatever's wrong with your apartment's wiring.
If the drop doesn't happen, there are two likely causes. Either the soil where you drove the rod is too dry to provide a good ground, or one of the connections (clamp to wire, wire to cord, cord to sheet) is loose. Recheck each connection. If all the connections are solid, water the soil around the rod thoroughly with a hose for ten minutes and retest. Sometimes that's enough.
In persistently dry climates, some installers add a few pounds of bentonite clay around the rod to retain moisture and improve conductivity. This is overkill for most users but worth knowing about if you're in Arizona or somewhere similar.
Renter and apartment realities
A few practical things worth saying out loud.
Most rental leases don't prohibit installing a ground rod outside because you're not modifying the building's electrical system. The rod is your equipment. When you move out, you remove the rod, pull the wire, and the only evidence is a small hole in the soil that fills in within weeks.
Worth checking your specific lease for any clauses about modifications to the exterior of the property. Some particularly strict leases consider any installed equipment a violation. In those cases, ask your landlord. Most won't care.
For apartment buildings where you're not on the ground floor, the install is the same conceptually but harder logistically. You're running a longer wire from a ground-floor planting bed up to your window. This works but starts to feel like a project. Some people in this situation just accept that their grounding sheet won't be effective and don't buy one.
The honest reality: a ground rod is the right move for about 30% of grounding-sheet buyers. If your outlets test fine, skip it. If they don't, this is a thirty-minute job that solves the problem permanently.